

Table of Contents
In Part 1 of our Dig Assist series, I covered the three basics of Dig Assist Start — Level, Slope and Quick Measure. These features are easy to set up and use for improved operator performance. In this post, I’ll cover some of the advanced features you get with an upgrade to Dig Assist In-field Design and 3D.
How to use Grade Control for Excavators — Volvo Dig Assist: Part 1

How to use Grade Control for Excavators — Volvo Dig Assist: Part 2
How to use Grade Control for Excavators — Volvo Dig Assist: Part 3
By upgrading to In-field Design, upfront you get a few additional features compared to Dig Assist Start to enhance performance:
- You can program up to 5 layers per task.
- You can create a line to follow.
- You can save your level and slope tasks.
Creating Specified Layers: For anything you dig, especially any trench or ditch, you can program up to five layers, which is incredibly handy for excavator operators. The accuracy of each layer is important, and Dig Assist makes that easy. Suppose you’re putting in a water line that involves multiple layers with specific requirements for each. As an example, you could set up a line representing the bottom of the trench at 7 feet, then you can specify the layers on top:
- 6 inches of sand as your base
- 3.5 feet of gravel
- 2 feet of fill soil
- 1 foot of topsoil

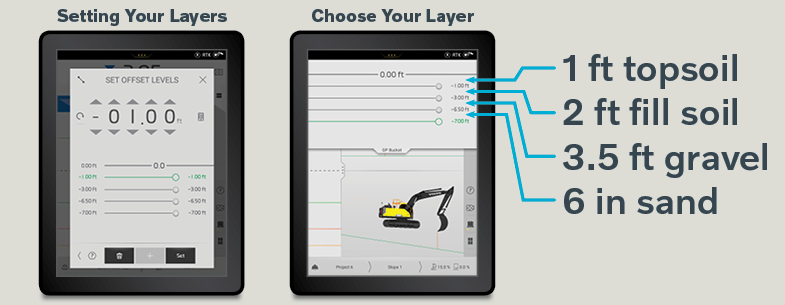
With Dig Assist, you can program five different layers at any given time and the Volvo Co-Pilot display will help you stay accurate for each, preventing unnecessary rework.
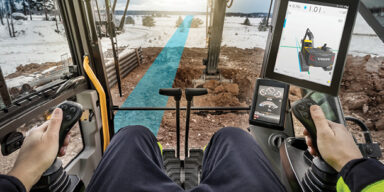
Following a Line: Suppose you need to dig a trench and follow a line NNW for a quarter mile. Dig Assist makes it easy. When you use Level and Slope, the machine tells you where and how far down you need to dig. When you use Line, the machine shows you where to go (i.e. the direction to move your machine). For example, if you’re digging a ditch with a 2-degree slope, the screen will show a sloped green line for you to follow. If you were required to dig that ditch in a NNW direction for a quarter mile, you simply enter that direction into the Volvo Co-Pilot display, and the screen will show a blue line indicating exactly where you need to steer your machine to hold the line.
There are two ways to do this:
Attachment is used to create a line from two bucket positions. If you don’t have a particular direction you need to go (e.g., “out that way”), you can touch the bucket to two points on the ground to create your line.
- Touch the ground once in front of you.
- Then reach out in the direction you want to dig and touch the ground again. That’s your line, and it’ll project that line on the screen for as long as you need to follow it.
Using Attachment, you don’t have to type in 335º NNW. But if you do want to dig in the direction of specific coordinates, just use the Compass feature.

Save Projects: With In-field Design, you can set up and save your projects, so any repeat jobs are even faster.

Get Even More Features with In-Field Design
This app uses GNSS and RTK navigation technology to offer incredible accuracy for excavation jobs. You can dig trenches and more complicated shapes in three dimensions, which you easily define on the Volvo Co-Pilot display. This eliminates the need for surveyors to mark out your excavation site.
With In-Field Design, you can use the display to quickly design your own project, right there in the cab in a matter of minutes. You have the option to design a trench “Profile” or to draw an excavation “Plan” — these include depth, shape, slope, etc. Whichever you choose, once you set it up and save it, you’re ready to dig. And note, we’ve now included a new angle grid screen that makes it faster and easier to draw shapes in both Plan and Profile modes. You can learn more about the angle grid screen in Part 3 of this series.

Here are examples of how In-Field Design works for each option:
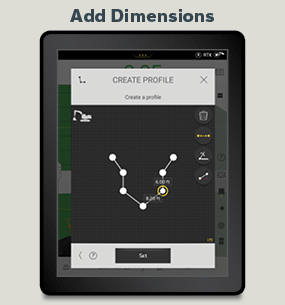
Profile: These are the simple steps to create a profile (i.e. a custom-shaped ditch) using In-Field Design:
-
- Select a profile for the type of trench you want to dig.
- Modify your profile by dragging the hot spots on the Volvo Co-Pilot display.
- Add in your dimensions.
- Select a starting point for your profile (i.e. the path of your trench). You can draw the path with your finger or set the path up with your machine.
- If you elect to draw the path, you simply assign the distances and direction of your trench profile.
- Press the Set button to save your profile and you’re ready to start digging. Here’s what a completed profile looks like on the Volvo Co-Pilot display.
- Select a profile for the type of trench you want to dig.


Plan: A plan (essentially a flat surface with boundaries) can be anything you need to excavate in an open field or yard. For this example, we’ll demonstrate how to plan a dig for a swimming pool. At some of our past shows, I’ve actually talked to some grade school kids who are attending with their parents and asked, “Wouldn’t you like a pool? How about you draw a pool for your dad?” I get them to go through the screen, and in two and a half minutes, they have their pool drawn. That’s how easy it is to use. To do it:
- First, choose one of the starter plans, and then modify it into the shape you want on the Volvo Co-Pilot touchscreen.
- Draw the shape. Just touch the dots and drag them where you want them.
- Set the depth and slopes.
- Identify the exact location for the pool by orienting your excavator to your design and touching your bucket to the ground. That way the system knows where you are in relation to your pool plan.
- Save your plan. Now you’re ready to start digging, and you know exactly where the pool will go.


In-field Design allows you to draw plans with a wide range of shapes, depths, slopes and more. As I mentioned, it only takes minutes, and it will make quick work of your excavation project.
THE ADVANTAGES OF DIG ASSIST 3D
3D is a good option for complex or larger projects. With excavators, upgrading to 3D involves running either the Topcon 3D-MC or Trimble Earthworks apps on the Volvo Co-Pilot. If you’re already using Topcon or Trimble on other pieces of equipment, you can do the same thing on a Volvo excavator. You buy a license for the software of your choosing and run that program on the Volvo Co-Pilot — both systems will operate using the Volvo sensors and utilize the Volvo Co-Pilot screen.
If you aren’t currently using Topcon or Trimble, you would simply make a call to get an access code, put it in Volvo Co-Pilot, and then you’d have access to the 3D software. When you buy the basic package, all of the equipment is loaded on the machine: all your initial measurement sensors, the laser catcher on the back of the machine that will be your two satellite antennas and a smart receiver. So, when you buy the basic package, everything you need for 3D is already there, but if you don’t need it, you don’t pay for it. If you want it, you just upgrade the software to where you need it for the types of jobs you’re doing.
While the features in In-Field Design and 3D are advanced, they’re still really easy to learn and use — and operators are finding that they help speed up jobs and improve their accuracy. Less rework means better productivity and higher profits. If you have additional questions about any of the features I’ve discussed so far in this series, let me know in the comments below.
How to use Grade Control for Excavators — Volvo Dig Assist: Part 1
How to use Grade Control for Excavators — Volvo Dig Assist: Part 2
